The Flagstaff War, Bay of Islands, New Zealand, 1845
Whitaker Denby, Seaman, H.M.S. Hazard
W. Love, Seaman, H.M.S. Hazard
William Lovell, Seaman, H.M.S. Hazard
Private Alexander May, Royal Marines
Colour-Sergeant J. M. McArthy, Royal Marines
Frederick George Minikin, Seaman, H.M.S. Hazard
Christ Church, Russell, New Zealand
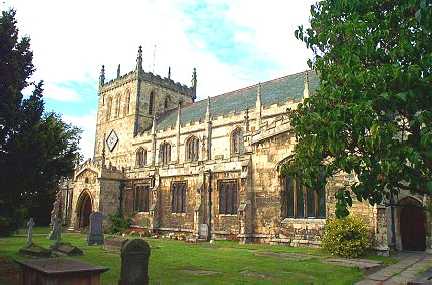 St. Laurence's Priory Church, Snaith
The Man
The countryside around Snaith in South Yorkshire is not the most picturesque in God’s Own County; flat, wide fields, punctuated by drainage ditches and marshland, on the banks of the Aire as it meanders its way towards the Ouse and the Humber. The villages are attractive though, and Snaith’s parish church of St. Laurence is an impressive example of a Norman priory church. It was in St. Laurence’s that, in October 1812, Whitaker Denby was baptized.
Whitaker was the son of George and Mary Denby, his unusual Christian name being his mother’s maiden name. George was an agricultural labourer, born in Balk, a village south-east of Thirsk in North Yorkshire, but Mary was a native of Cowick (now East Cowick), just east of Snaith, and it was in that village that they set up home.
Between 1812 and 1829 the couple had eight children, but it is likely that Whitaker, the eldest, had left home by the time the youngest, George, was born. Presumably not attracted by the prospect of a life as a farm labourer in the flatlands of the lower Ouse, Whitaker at some point enlisted in the Royal Navy.
The decision would have been more than just a lust for adventure.. During the 1820s the wages of an agricultural worker in the region were low and prone to fluctuation, with most of a man’s wages, if he had a family to support, being taken up by basic foodstuffs. In contrast a Royal Navy seaman would get a regular wage at least half as much again as that of a farmworker, with food at sea provided, and with the prospect of a career structure in an increasingly professionalized navy. By the time Whitaker enlisted the Napoleonic-era image of a press-ganged Navy had gone, replaced by one staffed entirely by volunteer recruits. Joining the Royal Navy was a career move.
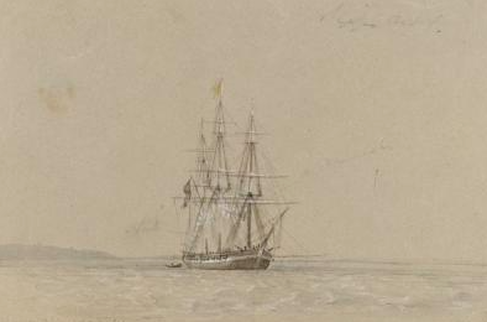
An 1841 painting of H.M.S. Hazard flying quarantine flag, probably off China
The Background
Meanwhile, as Whitaker was growing up, Britain was beginning to assert itself in New Zealand, following the whaling stations that began to establish themselves from the late eighteenth century onwards. Britain was not the only potential colonial presence, as both France and the United States had whaling ships in the seas around the islands, but Britain’s ownership of Australia meant it would inevitably have an interest in relatively-nearby New Zealand. By the 1830s the British were the dominant European presence on the islands, and were asserting territorial control, but that brought them into confrontation with the Maori.
The Maori were an established force in New Zealand. Although not a united body, different tribes, under chiefs and sub-chiefs, controlled much of the land, conducted much of the trade with the whalers and other ships that visited the islands, and provided many of the whalers’ crews. They were familiar with modern guns, and recognized as experienced fighters, so the colonial British could not expect just to walk in and take their land.
In 1840, therefore, after years of negotiation, the British and the Maori chiefs signed the Treaty of Waitingi. It is now regarded as the foundation of modern New Zealand, and the place where it was signed is a major tourist attraction, but within a couple of years the Treaty was a subject of disagreement.
Fundamentally the British, under rising demand from settlers for land, thought that the Treaty opened the land up for settlement. The Maori had their villages, with surrounding lands, but everywhere else was available. The Maori disagreed. Their interpretation granted the British some authority, but essentially left the Maori independent; free to continue trading, free to follow their own laws and customs, and free to continue to occupy and use land that they regarded as theirs, even if, crucially, no-one was living there.
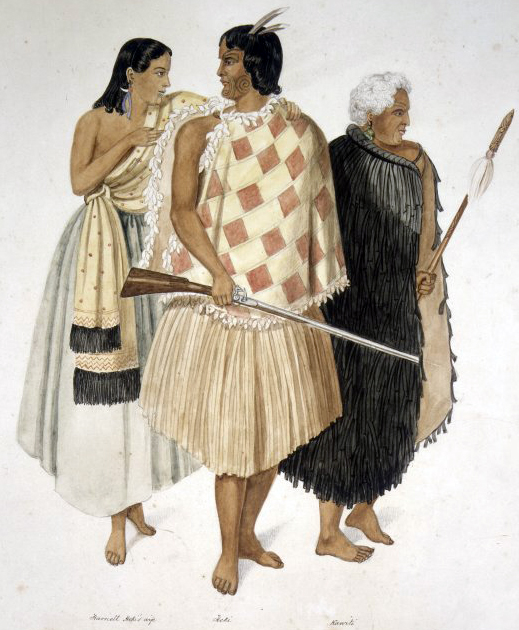
Hone Heke, centre, with Te Ruka Kawiti, and Heke's wife, Hariata
The Build-up
The first flashpoint did not take long to emerge. In 1841 the British colonial Government, based in Auckland, imposed customs duties and tariffs on a range of imports and exports. Maori suddenly found they had to pay more for goods in the traders’ stores, and had to pay tariffs on the goods they were trading. Nothing similar had ever existed in their society.
Then in late 1841, on Motuahoria Island in the Bay of Islands, a Maori named Maketu, the sixteen year old son of a Maori chief, killed (no argument about this) his employer and her family, a total of five people. He was arrested, taken to Auckland, tried, found guilty, and hanged. This would seem fair enough were it not for the fact that under Maori law murder did not lead to the death penalty. The execution of Maketu was the imposition of British law on the Maori, and the Maori of the Bay of Islands, under a leading chief, Hone Heke, protested vociferously, with calls for more active opposition mounting.
That opposition became active in July, 1844. Hone Heke was in the port of Kororareka (now Russell) to reclaim a runaway slave, a Maori woman named Kotiro, who was by now married to, or at least cohabiting with, a British butcher in the town. She dismissed Hone Heke’s claim on her, and traduced him, comparing him to a dead pig. This prompted Hone Heke and his men to remain in the town, demanding restitution for the insult, and intimidating the inhabitants. On the 8th July, to express their repudiation of British authority, some of Hoke’s men, led by a chief called Te Haratua, ascended Maiki Hill, to the south of the township, and cut down the flagpole that had been erected there to fly the Union Jack. So far, no-one had been killed, but it was clearly a provocation.
In August British ships and soldiers began to arrive. The SS Sydney, HMS Hazard and the brig Victoria brought with them around two hundred officers and men of the 99th Regiment to accompany Governor Fitzroy (of HMS Beagle and the Met. Office fame) as he attempted to defuse the situation. On September 2nd Fitzroy met a number of Maori chiefs and agreed to consider a review of the contested customs duties, while they undertook to keep Hone Heke in check and guarantee the safety of the local Europeans. Hone Heke himself did not attend, but in writing apologised for the cutting down of the flagpole, offering to replace it. Pleased with his peacekeeping Fitzroy and his men returned to Auckland.
On January 10th Hone Heke cut down the new flagpole.
On January 17th an officer and thirty men of the 96th regiment landed, erected another flagpole, and a guard was placed, consisting of soldiers and local Maori who owed an allegiance to a pro-British chief, Tamati Waka Nene.
On January 18th it was cut down again.
Still no-one killed, no-one injured, but in February came escalation. Some warriors under Hone Heke’s uncle, a chief called Te Ruki Kawiti, mounted a series of raids on outlying farmsteads around the town. Again, no-one was killed or injured, but property was stolen, and the unrest among both Maori and European communities became palpable.
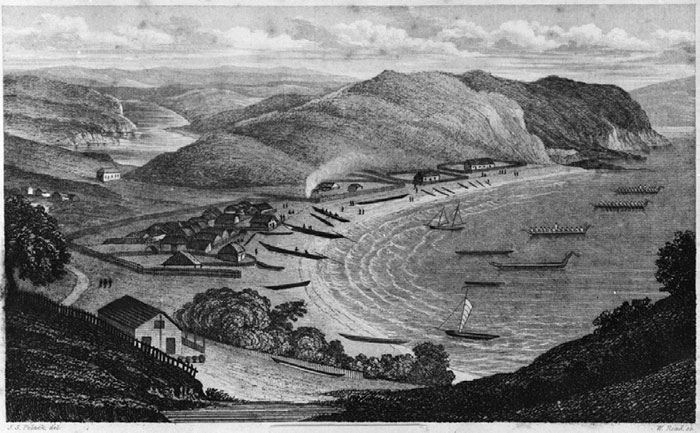
A view of Kororareka in 1838
The Action
Whitaker Denby now enters the story. He was a seaman aboard HMS Hazard, an 18-gun sloop, which arrived off Kororareka on February 15th loaded with materials for the building of a blockhouse around the position of the flagpole. By the end of the month the flagpole had been re-erected yet again, protected by twenty soldiers stationed in the blockhouse. The British force in Kororareka was now considerable: sixty men of the 96th Regiment, around two hundred colonists and merchant sailors, with ninety Royal Marines and sailors on board the Hazard.
With tension rising a group of Maori warriors who approached Kororareka on the 10th March were fired upon, and driven off. This appears to have prompted a more serious incursion the next day.
At dawn on the 11th the Maori launched a two-pronged attack. On Maiki Hill Hone Heke went again for the flagpole, and this time there were fatalities. The small band of soldiers from the 96th Regiment who were in the blockhouse guarding the flagpole were overwhelmed and killed, and the pole was yet again cut down.
Meanwhile another group of warriors under Te Ruki Kawiti attacked Kororareka. It is quite probable that this was a diversion, designed to draw a detachment of soldiers and sailors under Lieutenant Barclay of the 96th, who were stationed in a barracks between the beach and the blockhouse, away from Hone Heke’s attack. That strategy worked, but the Maori plans were spoilt by the appearance of a force from HMS Hazard, who had just landed to strengthen the blockhouse’s defences.
To their surprise, Te Ruki’s warriors now found themselves engaged in fighting with Barclay’s men in the barracks, and also with the Hazard’s men, who were occupying the fenced churchyard. Barclay’s men had a single gun, but as the fighting progressed he was told that the force in the churchyard was running out of ammunition. The barracks were abandoned as Barclay hurried to help the Hazard’s men, but the gun had to be spiked first. A seaman from the Hazard, William Lovell, successfully completed the task, only to be shot dead as he attempted to join the others.
Five more men from the Hazard died in the fighting in the churchyard, a small area surrounded by a low fence. Two were killed attempting to support their captain, Commander Robertson, as he charged after a retreating Maori only to be shot and severely wounded. The other three died in the general melee, probably shot, although the Maori were also armed with knives and hatchets. Overall two marines and three seamen died in the churchyard and one of them, a long way from the wetlands of the lower Aire, was Whitaker Denby.
With fatalities in the churchyard, at the temporary barracks and at the blockhouse the British, probably outnumbered, felt it wiser to withdraw. They retreated to the beach, and both they and the town’s civilian population were evacuated. The town was then looted by the Maori, but the evacuation appears to have been untroubled, as Hone Heke had previously promised that no women or children would be harmed in his argument with British.
Carrying the evacuees away to Auckland the ships left Korarareka, leaving the flagstaff down. The area was now back under Maori control, although not all local Maori had been involved. Two prominent local chiefs, Pamare and Tamati Waka Nene, had not joined in any of the attacks, staying within their respective pas, or strongholds.

A late-19th Century depiction of Hone Heke felling the flagstaff at Kororareka
The Aftermath
When the British returned two and a half weeks later it was in strength. Lieutenant-Colonel William Hulme commanded troops from the 58th, 96th (his own regiment) and 99th Regiments, marines from various Royal navy ships, and a Congreve Rocket Battery. On the 29th March Hulme launched his attack – on Pomare’s pa! Offering no resistance the pa was shelled from HMS North Star before a puzzled Pomare was arrested and the pa destroyed.
The inanity of Hulme’s actions can be gauged from what happened the following month. As the British reoccupied Kororareka, the Maoris were arguing among themselves, and April saw a number of armed skirmishes between Hone Heke and Te Kawati on the one side, and the pro-British Tamati Waka Nene on the other. It should have been relatively easy for the British to subdue a divided enemy.
In May Hulme decided to move militarily. With no guns, but with the Congreve rockets, he attacked Hone Heke’s well-fortified pa at Puketutu, near Lake Omapere. It was an utter failure. The rockets either missed or caused no damage, and when Hulme tried to storm the pa he was beaten into retreat, with thirteen men killed and thirty-nine wounded. A few days later three companies under Major Cyprian Bridge attacked a pa on the Waikare inlet. This time the pa was abandoned, but the Maoris who had been inside fought in the forest around, and drove Bridge’s men back. By the end of May Hulme’s efforts were deemed a failure, and he was replaced by Lieutenant-Colonel Henry Despard.
Despard possessed some luck that Hulme did not have, nor perhaps deserve. An inter-Maori pitched battle at Te Ahuaka Pa between Hone Heke and Tamati Waka Nene saw the former seriously wounded. With their chief out of action Hone Heke’s men retreated, and under the leadership of Te Kewati fortified a pa at Ohaeawi. On June 23rd Despard arrived there, in the rain and the mud, this time supported by proper artillery.
The proper artillery did not at first succeed. Three days of continuous cannon-fire had no effect on the pa, and on July 1st Te Kawati became even more provocative.
Tamati Waka Nene’s men were with Despard, and on a venture out of the pa Te Kawati’s men raided their rival Maoris’ camp and captured their Union Jack. Te Kawati then flew the British flag in his own camp – but he flew it at half-mast, upside down, and under a Maori cloak. Insulted, infuriated and frustrated Despard ordered a frontal assault on the pa palisade. Within minutes thirty-three British troops were dead and sixty-six were injured, including two officers, Captain Grant of the 58th, and Lieutenant Philpott of the Hazard.
Despard had to withdraw, but he persisted with the shelling for over another week, and by the 8th July the Maori had abandoned the pa, which was destroyed. Despard returned to Kororareka, and Hone Heke ordered the building of another pa at Ruapekapeka, this time specifically designed to resist shelling.
The new pa was besieged in December, and resisted successfully for two weeks, but on January 11th Hone Heke and Te Kawati sued for peace, knowing that continued fighting would disrupt the harvest. Sir George Grey, who had replaced Fitzroy as Governor, agreed to the peace, including pardons for all involved and promising that there would be no confiscation or arbitrary occupation of land.
It would appear that Hone Heke won the Flagstaff War. The symbol that represented it all, the flagpole, was not re-erected until 1858, and when it was the men who lifted it were veterans from Hone Heke’s and Te Kawati’s warriors of the previous decade.
Christ Church at Russell still stands, and the memorials for the Hazard's dead can be seen there, the original wooden one inside, and a whitewashed stone one outside. They make a poignant memorial, standing in the churchyard where the men died.
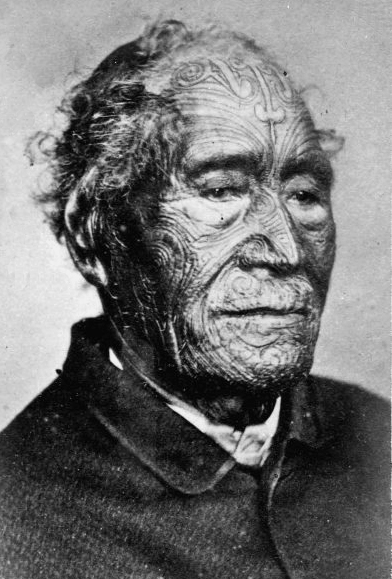
Head & shoulders portrait of Tamati Waka Nene in the 1860s
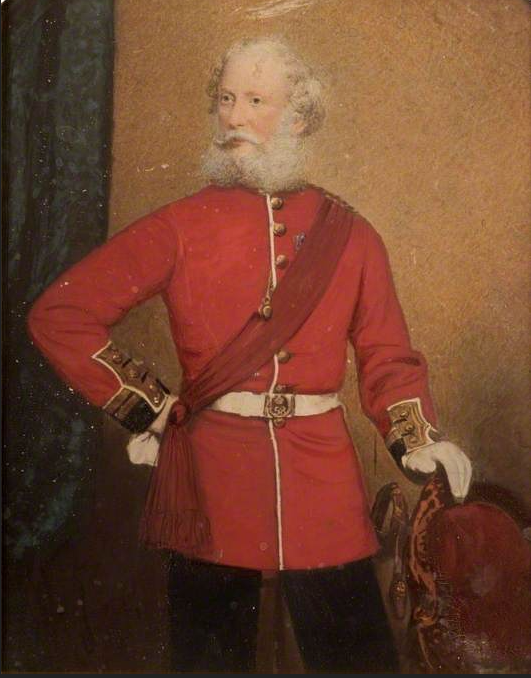
Cyprian Bridge, when Lieutenant-Colonel in command of the 58th Regiment
Afterwards
It would be nice if there were a similar memorial to Whitaker in Snaith’s St. Laurence’s, but monuments to the children of farmworkers are few – it would have been more likely had George been a landowner. As it is, there is no stone for Whitaker, as his father died an agricultural labourer in 1854, surviving his eldest son by nine years, and his wife by three. Both George and Mary were buried in St. Laurence’s churchyard. I have failed to trace their other children.
What of the other characters? Lieutenant-Colonel William Hulme retired after being replaced by Despard. He built a house in Auckland which was called Hulme Court and is still extant, one of Auckland’s oldest surviving houses. He was appointed New Zealand’s first Postmaster-General, and died in 1855. Major Cyprian Bridge, born in Ontario in 1807, retired to England, resided at 8 Lansdowne Place, Cheltenham (still standing as offices) and died there in 1885. Irish-Huguenot Henry Despard (whose uncle, Colonel Edward Despard, was the last man to be hung, drawn and quartered for treason in Britain) left New Zealand after the war, and was later promoted to General. He died at Exeter in 1859, aged 74.
Hone Heke emerged from the war with enhanced prestige and increased support among the Maori. He died of tuberculosis in 1850, still only in his forties. Te Kawiti remained an independent chieftain up to his death in 1854. His son, pro-British and a devout Christian, negotiated the re-erection of the contentious flagpole. Tamati Waka Nene developed into the leading pro-British Maori in the north, often acting as their spokesman. He died in 1870, and is commemorated with a large monument in the churchyard at Russell.
The flagpole erected by Te Kawati’s veterans in 1858 still stands on Flagstaff Hill.
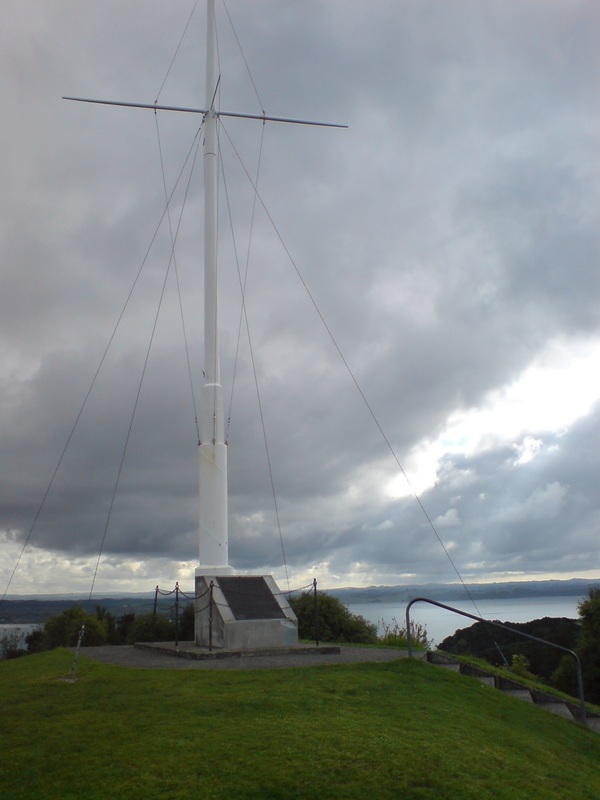
The flagstaff at Maika Hill, now known as Flagstaff Hill, Russell
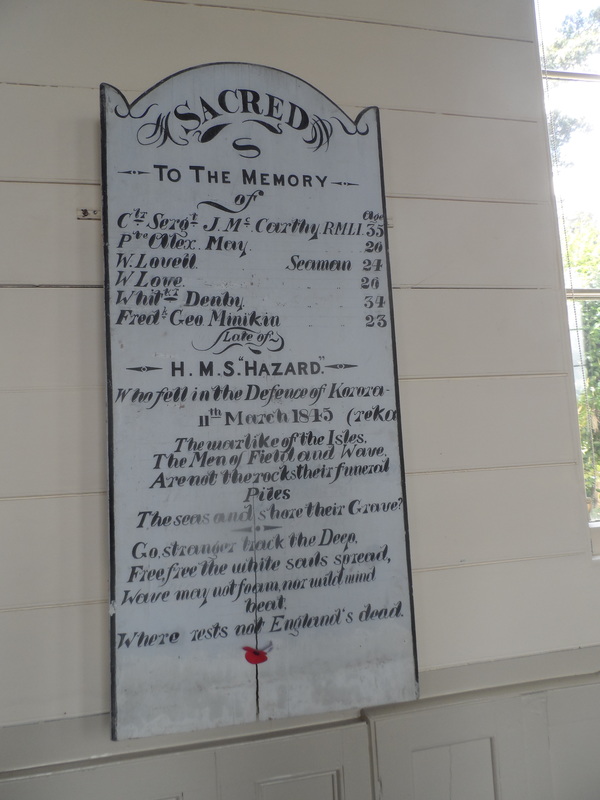
Memorial board to the dead of HMS Hazard inside Christ Church, Russell
Sources
Pictures
Cropped photo of Hone Heke and his wife, Hariata, c.1845 - from original drawing by Joseph Jenner Merrett (1816-1854)
Christ Church, Russell, about 1917 - courtesy of Russell Museum
St. Laurence Priory Church, Snaith - photo by Bill Henderson
HMS Hazard flying yellow quarantine flag, 20th September 1841 - by Sir Walter Oswald Brierly (1817-94), National Maritime Museum, London, ID: PW8496
Te Ruka Kawiti with his nephew Hone Heke and Heke's wife, Hariata - Joseph Jenner Merrett
Kororareka, 1838 - print by J. S. Polack, Alexander Turnbull Library, Wellington, Ref: PUBL-0115-1
Hone Heke fells the flagstaff at Kororareka - drawing by Arthur David McCormack (1860-1943)
Head & Shoulders Portrait of Tamati Wake Nene
Lieutenant-Colonel Cyprian Bridge, Coimmander of 58th Regiment - unknown artist, Northampton Museums and Art Gallery
The flagstaff on Flagstaff Hill - photo by Ingolfson
HMS Hazard Memorial at Christ Church, Russell - the author
History
Wikipedia - pages on The Flagstaff War and links to associated battles and character
Ancestry
'The New Zealand Wars: A History of the Maori Campaigns and the Pioneering Period: Volume 1: 1845-1864' - James Cowan, R.E. owen, Wellington, 1955
ⓒ Jonathan Dewhirst, 2016
